How To Modify A Default Joomla 1.5 Template
Joomla is a popular open-source content management system with a lot of possibilities. One of the strengths of Joomla is the vast number of extensions and templates available, both free and commercial. You can download and install a template in a few simple steps, although some templates are included in the Joomla installation package, and most users start with one of those.
This article takes you through one of the default Joomla 1.5 templates and shows you how to modify it for your website.
Joomla 1.6, which was released earlier this year, has a different way of handling templates. For instance, it introduced the concept of template styles. However, many users are still on Joomla 1.5. Thus, the information in this post will be valid to many Joomla users. Also, the techniques used in this post can be applied to Joomla 1.6 and later versions even if the template structure is somewhat different.
Templates Available In Joomla 1.5
Joomla 1.5 comes with three front-end templates. One of them, Beez, is provided merely as an example of how to build a template (it’s hideous).
The other two, JA Purity and Rhuk Milkyway, are more usable.
The Rhuk Milkyway template includes rounded corners in its design. The template is often used as a framework to demo third-party extensions for Joomla 1.5.
The JA Purity features a couple of color themes and template parameters for adjusting the template’s width, logo type (text or image) and other options.
Tools You’ll Need
For this tutorial, you’ll need the Firefox browser. You’ll also have to download and install the Firebug add-on for Firefox (info on getting started). Firebug integrates with Firefox and puts a wealth of development tools at your fingertips as you browse. You can edit, debug and monitor CSS, HTML and JavaScript live on any Web page, which will be handy when you later implement working code in your Joomla style sheet. Firebug is an invaluable tool for website developers and designers and a must have for this tutorial.
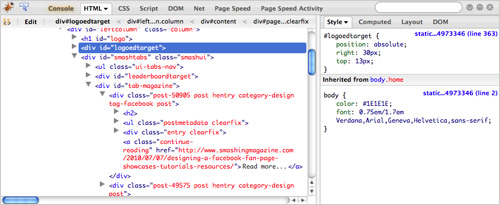
You will also need an HTML text editor, Dreamweaver or the like, as well as FTP access to your Joomla files.
Another option is to install the free eXtplorer component for Joomla. This is a file manager that lets you edit and save files directly in the browser.
Pick Your Default Template
In this article, I will use the JA Purity template, which I find is easiest for a beginner to modify.
When you enable the template, it will look something like this:
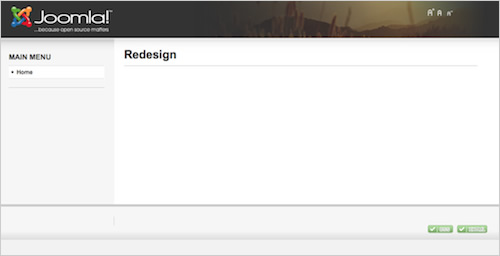
As you can see, some elements here need to be changed. Thankfully, this template is flexible and easy to understand.
Understanding The Template
A Joomla template is made up of several files. The ones we’ll need to consider in this tutorial are:
- The main index file /templates/ja_purity2/index.php
- The main template file /templates/ja_purity2/css/template.css
- The CSS menu file /templates/ja_purity2/css/menu.css
- The template details file /templates/ja_purity2/templateDetails.xml
Work From A Copy
If you want to be able to roll back any changes, make a copy of the template before starting. This way, you can always go back to the original and copy the code there if you mess up. Also, without a copy, you might overwrite your modifications if you use the default folder and at some point upgrade your Joomla installation.
Copy the template folder and give it a new name. For this tutorial, I’ll name the folder ja_purity2.
You now have two copies of the template on your Joomla website. If you go to Extensions → Template manager, you’ll see that both templates are named JA Purity. This is not good because we won’t be able to easily tell which one we’re working with:

To name the copied template to something else, you will have to edit the template XML file.
Open the file at /templates/ja_purity2/templateDetails.xml, and change the name. Then save the file.
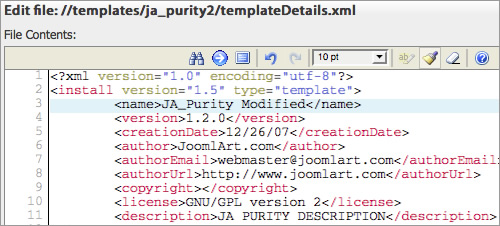
You will see that the copy in the folder ja_purity2 now has the name JA_Purity Modified. Now, select the radio button to the left of your JA_Purity Modified template, and click the “Default” button. This will activate your copy as the template for the website.

Choose What To Modify
There are good reasons to modify the default template. You might like the structure but want to give the website a new design. Or you might already have a logo and brand colors or a complete Photoshop mock-up created by you or another designer. Some of you will have to recreate an existing website in Joomla, keeping the design and elements the same.
We’ll go over the elements of the template and how to modify them to create whatever design you like.
Template Overrides
There is a /templates/ja_purity2/html/ folder, where the template overrides are stored. Getting into template overrides in detail is beyond the scope of this article. For more on this, please see my blog post on the subject.
In short, template overrides override the output of Joomla’s core components and modules, without requiring you to hack the core. This allows you to override the output of the content component, which shows the content of the website. When the Joomla core is updated, your overrides are left untouched. If you modify the same files in the core, they might be overridden by a future Joomla update. Template overrides can also be used for installed components and modules.
Module Positions
Every Joomla template has a set of module positions. These are PHP snippets that fetch one or more modules assigned to that position.
We’ll talk more about module positions at the end of this article.
Modify The Template Parameters
The first thing I usually do is look at the template parameters in the Joomla administrator. You can find this by logging into the Joomla admin area. Then go to Extensions → Template manager → JA_Purity.
On the right side you will see a list of parameters. These are unique to the template, because they are added by the developer. The settings made here are saved in the params.ini file in the /templates/ja_purity2/ folder and are picked up by the index.php file when a page loads.
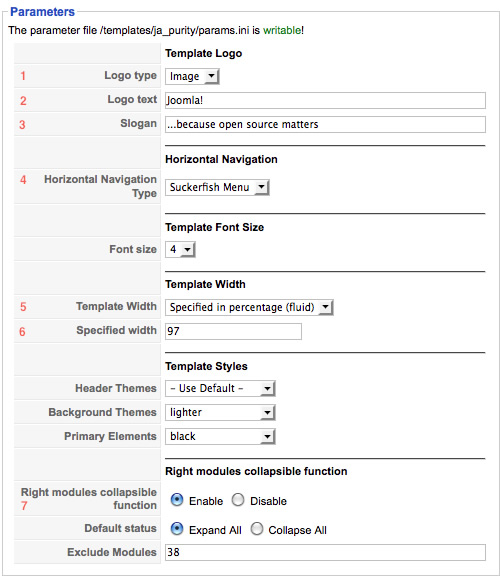
The JA Purity template has a few options. Let’s look at a few of them:
- Logo type You can use either an image file or text here. The logo image must be saved in the /templates/ja_purity2/ folder and be named logo.png. The default logo has dimensions of 207×80 pixels.
- Logo text If you choose “Text” as the logo type, this is where you would enter your text.
- Slogan This is the line of text that appears below the logo.
- Horizontal NavigationType You have two options here: SuckerFish Menu and JAMoo Menu. Leave it on SuckerFish Menu for now.
- Template width For some reason, the template defaults to a width of 97%. I don’t think I’ve ever given a website a fluid width, at least not in the last 10 years. ;) Change the setting to “Specified in pixels.”
- Specified width Here, enter a pixel number, like
980. This will be the width of the template container. - Right modules collapsible function Nice as it is, I normally disable this function, which lets the user collapse the right-column modules. I don’t really see this used much.
The remaining parameters can be left as they are for now.
The parameters look like this in the params.ini file:

So far so good. You have now adjusted everything that you can change without going into the code.
You’ll notice some buttons at the top of the page. As you can see, you have access to the HTML and CSS directly from here. For quick modifications, using this is okay. However, I find these views to be less flexible than using an external editor or FTP access or using the eXtplorer component.

Change The Logo
The first thing you’ll want to do is add your own logo to the template.
To change the logo, upload a new image file named logo.png to the /templates/ja_purity2/ folder.
If the logo has the same dimensions as the original, you’re all set. The original logo is 207×80 pixels:

If your logo has different dimensions, you’ll need to edit the dimensions of the logo and header in the CSS. In this example, we’re adding a logo with a width of 270 pixels and a height of 120 pixels.
If I had just uploaded the logo to the template image folder with the same name, this is what it would look like:
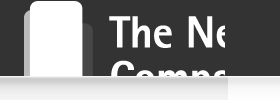
For the logo to appear correctly, I need to adjust the CSS for both the logo itself and the header containing it.
You can use Firebug to inspect the code for the logo and header. Right-click on the header image to bring up the context menu, and select “Inspect element”:

The Firebug window will open in your browser, and you’ll see something like this:

Using Firebug, you can easily detect where the relevant CSS is located and start experimenting with changes. You can change the CSS in Firebug and see the changes immediately:
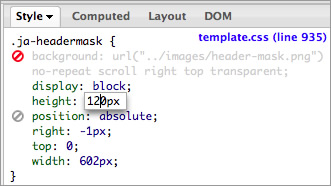
Here, we’ve disabled the background image for .ja-headermask by clicking the icon (turning it red), and we adjusted the height to 120 pixels. The CSS will auto-complete for you, making it really fast to work with.
When you’re done experimenting with Firebug, you can apply the changes permanently to the template CSS file. This saves a lot of time going back and forth.
To adjust the CSS, we open the /templates/ja_purity2/css/template.css file.
On line 921, we find the following code:
#ja-headerwrap {
   background: #333333;
   color: #CCCCCC;
   line-height: normal;
   height: 80px;
}

#ja-header {
   position: relative;
   height: 80px;
}
In this case, we adjust the height of both #ja-headerwrap and #ja-header to 140 pixels. I want to leave some more space above and below the logo, so I’ve add a padding-top to the #ja-header:
#ja-headerwrap {
 background: #333333;
 color: #CCCCCC;
 line-height: normal;
height: 140px;
}

#ja-header {
   position: relative;
   height: 140px;
   padding-top:10px;
}
The header now looks like this:

You can see that the header is taller but the logo is cropped. The reason is that the logo is contained inside the h1 link tag and set as a background. So, we need to adjust the size of the box that contains it.
Further down in the CSS file, we find this code:
h1.logo a {
 width: 208px;
 display: block;
 background: url(../https://archive.smashing.media/assets/344dbf88-fdf9-42bb-adb4-46f01eedd629/0d87fcef-3d73-43a6-9733-4e8681084c36/logo.png) no-repeat;
 height: 80px;
 position: relative;
 z-index: 100;
 }
I’ll change the width to 270 pixels and the height to 120 pixels. Now, the logo looks correct:

As you might also have noticed, this is the spot in the CSS file where the path to the logo is stored. So, if your logo is online, this is where you would add the URL. The default image is located in the /templates/ja_purity2/ folder. You can see that the path to the file is relative; the developer has used the …/ format to identify the URL. To identify a folder in the website’s root, write out /https://www.smashingmagazine.com/wp-content/uploads/2010/08/ followed by the image’s file name.
h1.logo a {
 width: 270px;
 display: block;
 background: url(/https://www.smashingmagazine.com/wp-content/uploads/2010/08/adifferentlogo.png) no-repeat;
 height: 120px;
 position: relative;
 z-index: 100;
 }
Change Or Remove The Header Images
JA Purity comes with a built-in header image rotator. You can use it with your own images or remove it completely. To use it, create images at a size of 600×80 pixels. Upload the images to the /templates/ja_purity2/header/ folder. The script will read the images from the folder and rotate them, fading each image on both sides.

As nice as that is, you can remove the image rotator from the header if you’d like. Open the index.php file in your editor of choice, and locate the following section:
<!-- BEGIN: HEADER -->
<div id="ja-headerwrap">
<div id="ja-header" class="clearfix" style="background:
url(<?php echo $tmpTools->templateurl(); ?>/https://www.smashingmagazine.com/wp-content/uploads/2010/08/header/
<?php echo $tmpTools->getRandomImage(dirname(__FILE__).DS.'https://www.smashingmagazine.com/wp-content/uploads/2010/08/header'); ?>)
no-repeat top <?php if($this->direction == 'rtl') echo 'left'; else echo 'right';?>;">
<div class="ja-headermask"> </div>The header images are placed using the background style for #ja-header. Also, #ja-headermask acts as a mask to fade the image on both sides. To remove the header images and mask, change the code to this:
<!-- BEGIN: HEADER -->
<div id="ja-headerwrap">

<div id="ja-header" class="clearfix">
Basically, we’re removing the background styling from #ja-header and removing #ja-headermask entirely.
Remove Other Elements
While we’re at it, we might as well remove a few more elements. The template has a tool in the header to change the font size.

Comment that out or remove it if you don’t need it:
<!-- <?php $tmpTools->genToolMenu(JA_TOOL_FONT, 'png'); ?> -->Also, two CSS and XHTML validator buttons are in the footer:

You’ll probably want to comment that out or remove the entire section:
<div class="ja-cert">
 <jdoc:include type="modules" name="syndicate" />

 <a href="https://jigsaw.w3.org/css-validator/check/referer" title="<?php echo JText::_("CSS Validity");?>" style="text-decoration: none;">
 <img src="<?php echo $tmpTools->templateurl(); ?>/https://www.smashingmagazine.com/wp-content/uploads/2010/08/but-css.gif" border="none" alt="<?php echo JText::_("CSS Validity");?>" />

 </a>
 <a href="https://validator.w3.org/check/referer" title="<?php echo JText::_("XHTML Validity");?>" style="text-decoration: none;">

 <img src="<?php echo $tmpTools->templateurl(); ?>/https://www.smashingmagazine.com/wp-content/uploads/2010/08/but-xhtml10.gif" border="none" alt="<?php echo JText::_("XHTML Validity");?>" />
 </a>

 </div>
Change The Header’s Background Color
To change the background color of the header, we just have to change the hex code for the background-color. For this example, I’ve gone with a blue color with the code #3E5E93 (okay, not exactly a design statement, but it shows the point).
#ja-headerwrap {
 background: #3E5E93;
 color: #CCCCCC;
 line-height: normal;
 height: 140px;
 }
This gives the entire header this blue background color. Of course, you can add a background image to the header if you prefer that.
Now, your template looks something like this:
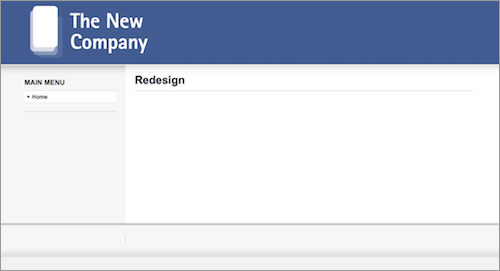
As it is, the background color runs across the entire top of the website. If you hover your cursor over #ja-header in Firebug, you’ll see that the div is highlighted on the page. We can experiment here with a color other than that of #ja-headerwrap.
To do this, we change the background color of #ja-headerwrap to transparent. We’ll also change the ja-header background color to the blue.
Now, the header looks like this:

Looks a bit odd, right? We’ll have to remove the shadow, which is located below the #ja-headerwrap. This must be done on all four divs that have the shadow background image. You can see how it looks in Firebug:
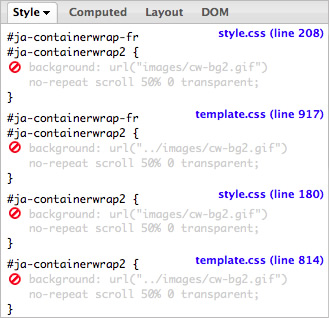
You’ll see that these backgrounds are entered in two different CSS files: template.css and the file at /templates/ja_purity2/styles/elements/black/style.css (if the black is what you want).
To make it easy, add the following code to the bottom of the style.css file (because it loads after the template.css, it will override those styles):
#ja-containerwrap-fr,
   #ja-containerwrap,
   #ja-containerwrap2 {
   background-image:none !important;
   }
In addition to removing the shadows, I added a bit of padding and some borders around the main container. I also removed the background image here:
#ja-container2 {
    border-left:1px solid #DDDDDD;
    border-right:1px solid #DDDDDD;
    padding:20px 10px !important;

    }
Which gives us this result:
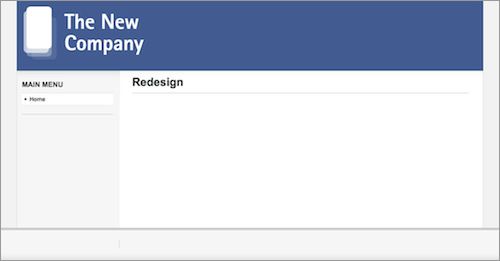
Not a design masterpiece, but definitely better than what we started with. Only your imagination limits you.
Taking It Further
By now you should have a good idea of how to adjust the template CSS and other settings to fit your needs.
The above tips are quite basic. You can extend you skill set by learning how to use template overrides, module positions and module chrome, to name a few.
- Template overrides. Code that overrides the default output of a module or component.
- Module positions. PHP snippets that put modules in the template.
- Module chrome. Code that controls the HTML or XHTML output of a module. (Read more on the Joomla website.)
Both template overrides and module chrome are too complicated for this article, but I will show you how to add a module position to the template.
Adding Module Positions
As mentioned, every Joomla template has a number of module positions. You can display the module positions in your template by adding the parameter ?tp=1 after the URL.
For example, entering https://www.joomla.org/?tp=1 shows you the module positions on Joomla.org.
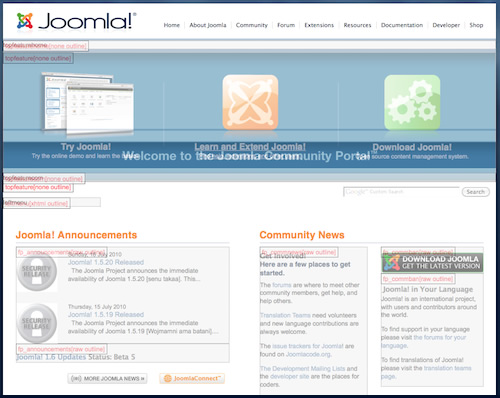
Note that this feature can be blocked by adding code to the .htaccess file (so don’t get confused if you try it out on a Joomla website and it doesn’t work).
The module positions in Joomla are located in the template’s index.php file.
There are basically two kinds of module positions: a regular module position and the component output.
The component output (e.g. Joomla articles, third-party component output, etc.) looks like this:
<jdoc:include type="component" />The regular module positions look something like this:
<jdoc:include type="modules" name="left" style="xhtml" />The name is the “Position” you choose when assigning your modules to the position.
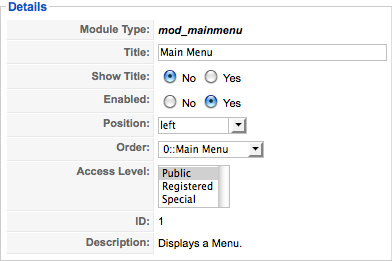
The style is the module chrome, or style output, applied to the module position.
The HTML output of the menu will be the menu items, wrapped by the module chrome:
<div class="moduletable_menu">
  <ul class="menu">

    <li id="current" class="active item1"><a href="#"><span>Home</span></a></li>
    <li class="item2"><a href="#"><span>Contact</span></a></li>

  </ul>
</div>
However, we don’t want to show the module chrome if there are no modules assigned to it. That’s why we add an if statement around the module position. This is a simple PHP snippet that checks whether a module is assigned to the left position or not:
<?php if ($this->countModules('left')): ?>
    <jdoc:include type="modules" name="left" style="xhtml" />

<?php endif; ?>
Of course, you can add more code that will be shown when the module position has modules assigned to it. JA Purity’s developer has added some more code to position the module in his design, as well as some comments:
<?php if ($this->countModules('left')): ?>
   <!-- BEGIN: LEFT COLUMN -->
     <div id="ja-col1">
        <jdoc:include type="modules" name="left" style="xhtml" />

     </div><br />
   <!-- END: LEFT COLUMN -->
<?php endif; ?>
This wraps the module neatly in a div named #ja-col1, which allows you to style the element with CSS. And the div is displayed only if a module is assigned to the left position.
The final output looks like this:
<!-- BEGIN: LEFT COLUMN -->
  <div id="ja-col1">
    <div class="moduletable_menu">
      <ul class="menu">
        <li id="current" class="active item1"><a href="#"><span>Home</span></a></li>

        <li class="item2"><a href="#"><span>Contact</span></a></li>
      </ul>
    </div>

  </div><br />
<!-- END: LEFT COLUMN -->
Using this simple method, you can add as many module positions as you’d like to your template. You could have positions for ads, more positions for the right or left columns (to divide those into more columns) or simply a position for a template that is missing a position exactly where you need it.
You can also add positions to contain scripts that you do not want to be displayed on the front end of your website. For instance, I’ve added module positions at the end of the head tag and the beginning and end of the body tag to be able to assign different types of scripts (Google Analytics, CrazyEgg, etc).
Adding The Position To The XML File
To make a new template position appear in the module position drop-down menu in modules, add it to the template XML file. Open the file at /templates/ja_purity2/templateDetails.xml again and look for the section called <positions>:
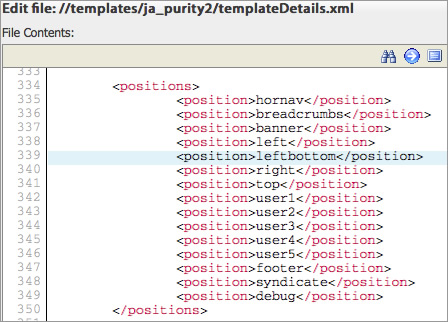
Add another line between <positions> and </positions>. For instance, if you add the position leftbottom, then add <position>leftbottom</position> to the file. Now, the module position will appear in the modules parameter view:
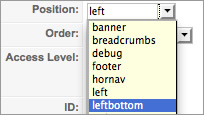
Actually, you don’t need to add the position to the XML file. Writing the position name into the position field is enough. However, adding it to the XML file is good, too. If no module is assigned to the position, then it will otherwise not appear in the list.
Conclusion
Of course, this is just scratching the surface of what can be done with Joomla templates.
To sum up, this is how you would proceed:
- With Firebug, inspect the element you want to change,
- Do experimental changes with Firebug to test your adjustments,
- Apply the CSS to the template style sheet,
- Check the adjustments in all major browsers.
As always, make these changes on a copy of your original template.
Good luck!
Further Reading
- 35 Beautiful Commercial And Free Joomla Templates
- How WordPress Took The CMS Crown From Drupal And Joomla
- Joomla And WordPress: A Matter Of Mental Models


 SurveyJS: White-Label Survey Solution for Your JS App
 Celebrating 10 million developers
 Register now for WAS 2026

 Register for free to attend Axe-con

