A Guide To CSS Debugging
We’ve all been there, at the end of completing CSS for a layout and — what’s that? Ah! An extra scrollbar! Or maybe an element is an unexpected color. And on some browsers, that new feature just doesn’t seem to be working.
Debugging — regardless of the language — is never a favorite task. CSS, like other languages, becomes easier to debug when you take time to learn a bit about its quirks. It also helps to become familiar with tools to help you both debug and prevent creating bugs in the first place.
Common Causes Of CSS Bugs
The first step in debugging is taking a step back and identifying the primary cause of the issue. In my experience, CSS layout issues often fall out of one of the following categories:
- Overflow of content from its parent resulting in extra or unexpected scrollbars and content being pushed out of the regular viewport area.
- Inheriting browser inconsistencies leading to mixed results across browsers and devices.
- Unexpected inheritance from the cascade where multiple styles override one another, which may cause alignment and spacing issues, among other things.
- CSS resiliency failures from DOM changes, including when child elements have gained wrapping divs or additional elements are unexpectedly added.
We’ll review debugging for each category by learning common culprits for these issues and see how to use dev tools and other methods to pinpoint the offending styles. Of course, we’ll discuss possible resolutions to these bugs as well.
General Debugging Tips
When something has gone wrong in your CSS, you can begin by using your favorite browser’s built-in DevTools to:
- toggle off rules one at a time
- toggle all rules off and bring them back one at a time
- remove or relocate elements
Due to the global nature of CSS, the problematic style for an element may be located in its parent, grandparent, or even further back up the tree. DevTools will display the rules most applicable to the element based on specificity at the top of the pane and then provide a stack trace of the cascade and inherited styles.
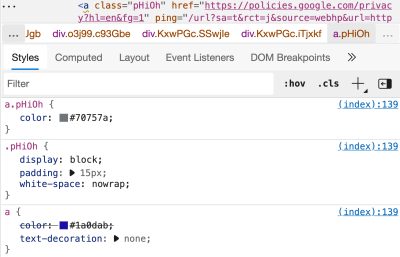
You can also try to isolate the specific layout issue by either placing only that part into a local file or using an online editor like CodePen or CodeSandbox. Be aware that using those editors may insert extra opinions that your local environment doesn’t have. For example, CodePen defaults to using the Normalize reset, which may introduce new problems if you’re not already using it. Toggle off any settings that don’t work for your project. Then, you can use DevTools to copy in the relevant HTML.
After that, another handy feature is to open the context menu (“right click” or equivalent) for your element and then select “Copy > Copy styles” from the menu. Repeat for each nested element as needed.
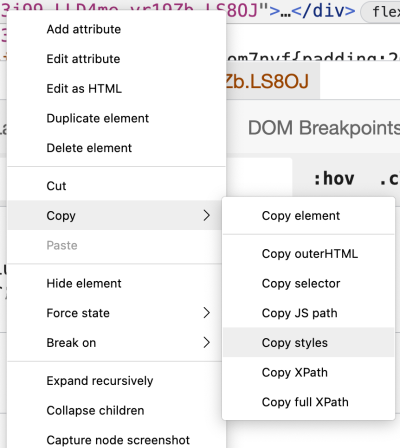
If the problem no longer exists after isolating it, it’s likely that an ancestor element is leading to the difficulties. You may choose to isolate starting from higher up the DOM tree, or you’ll likely need to inspect inheritance more closely. We’ll talk about inheritance a bit more later on.
If you can resolve the problem in your isolated component, you can bring the updated styles back into your main project stylesheet.

Chrome, Edge, Firefox, and Safari also have a way to track the changes you’ve made and save them to make it easier for you to copy over any updates.
- Chrome/Edge
Use the “kebab” more menu to select “More Tools > Changes” to open that panel. Additionally, you can persist your changes by using the local overrides feature. - Firefox
The “Changes” panel should be already available by default and next to the “Computed” tab. - Safari
Also offers the “Changes” panel by default, located in the same tab bar as the “Styles”.
Recommended Reading: “Examine And Edit CSS,” Firefox Developer Tools, MDN Web Docs
More ideas, tips, and tools will be discussed next.
Debugging Overflow
Overflow is usually one of the most apparent issues and can be pretty frustrating. It’s not always evident at a glance which element is causing overflow, and it can be tedious to try to comb through elements using dev tools inspectors.
“CSS is designed to not lose content, to not cause harm. In order to not cause harm, we show what overflows by default.”
— Miriam Suzanne, Why Is CSS So Weird? (video)
Thinking about it another way, the infamous meme of “CSS is Awesome” is, in fact, correct and intentional behavior if the base box was purposely set smaller than the size needed to accommodate that text. (If you’re interested, the original creator, Steven Frank, stopped by CSS Tricks to explain the origin).

A tried and true method to begin figuring out which element is responsible for overflow is to add the following CSS:
* {
  outline: 1px solid red;
}
Why outline instead of border? Because it will not add to the element’s computed DOM size. Adding borders will change element appearances if they’re already using a border and may falsely cause additional overflow issues.
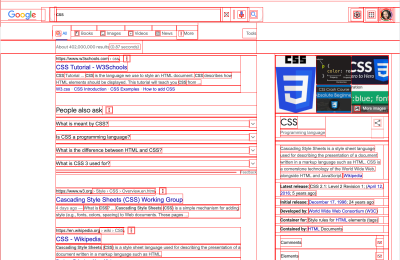
The intent of using outline is to reveal element boundaries and visualize how elements are nested. For example, if overflow is causing unexpected scrollbars, an outline can help point out which element is pushing out of the viewport.
In addition to this manual method, Firefox reveals scrolling elements and specify which elements have children causing overflow, as seen in this screenshot.
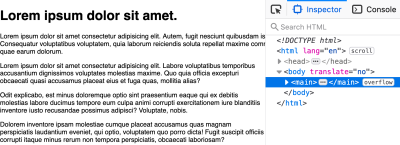
scroll, noting that it has become a scrollable region, and main has an indicator tag of overflow because one of the paragraphs expands beyond its boundaries. (Large preview)Common Causes Of Overflow
Typically when we’re concerned about overflow problems, it’s from a mismatch of width allowances between a parent element and its children.
One of the first things to check is if an element has set an absolute width without a responsive method to allow it to fully resize downwards. For example, a 600px box will trigger overflow on viewports narrower than 600px. Instead, you may be able to adjust to add in a max-width: 100% so that the element will also responsively resize:
.wide-element {
  width: 600px;
  max-width: 100%;
}
An example of when this would not be a complete solution is when the element triggering overflow also has margins that increase its computed size within its parent. In the following example, the paragraph is still forced outside the main element due to its horizontal margin.
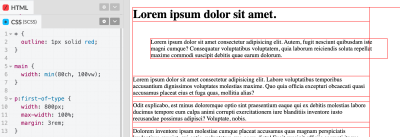
Fortunately, we can account for that margin by using the CSS math function calc to subtract the total area used by the horizontal margins:
p:first-of-type {
  width: 800px;
  max-width: calc(100% - 6rem);
  margin: 3rem;
}
Now, all that said, it’s not often we should be supplying absolute widths for elements. More often, it would be best to define only max-width if you need to control an element’s size. Again, this reduces bugs related to responsively sizing it. In fact, we can completely resolve the issues for our example by removing both the width and max-width values, which allows the paragraph’s default behavior to let it appropriately adjust within the available space of the main parent.
However, there are situations when the solutions we looked at make sense, such as applying max-width: 100% to create responsive images. And for some flexbox-based layout methods, you’ll also see width or flex-basis used with calc for the reason of accounting for margin.
Another common trigger for overflow has to do with one of the recognized mistakes in the design of CSS by the CSS Working Group. Number 6, in fact, which is that box-sizing should have defaulted to border-box instead of content-box.
All browsers currently ship with the legacy decision to set the element box model to use content-box, which means that an element’s border and padding are added to the computation of the element’s size. So, if you set absolute dimensions for width and/or height, you need to account for the extra space for any added border and padding.
To simplify this behavior, a best practice is to ensure your styles include resetting all elements to use border-box. This reduces the chance of overflow in many instances and makes the CSS layout more predictable due to removing complications from including borders and padding in the final element dimensions.
*,
*::before,
*::after {
  box-sizing: border-box;
}
Other causes of overflow fit a little better into the categories of bugs we’ll review next.
Debugging Browser Inconsistencies
While we’re living in a golden age of near-parity between browsers for critical features, there are still some legacy choices that can interfere. Every browser ships with a default stylesheet called user-agent (UA) styles.
Here’s an example of how those styles appear in the primary browsers:
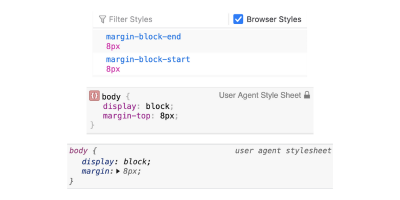
These happen to be highlighting one of those defaults that can be another common trigger for overflow. The body element has margin attached in every browser, with the top ones as commented:
body {
  /* Chromium and Firefox */
  margin: 8px;
  /* Safari/webkit */
  margin-top: 8px;
}
You may be familiar with the concept of a CSS reset. These have evolved over the years as both CSS and browser support have improved but resetting the body back to margin: 0 is usually a feature.
If you use CodePen, the default reset is Normalize.css, authored by Nicolas Gallagher and initially released in 2012. It can be found in many, many projects and is quite an opinionated reset. However, it’s worth noting that it has not been updated since November 2018.
Note: Another timely note here is that Internet Explorer will reach end of life officially on June 15, 2022). This means that many features are needed not only in resets but within our stylesheets, in general, will no longer be required!
CSS has been improving rapidly in the last couple of years, and of course, browsers are continually modernizing. An alternative reset that fits better with more modern projects is Andy Bell’s Modern CSS Reset. This reset is enough to smooth out the handful of things common to most projects that are still inconsistent cross-browser, while not being overly opinionated. It also considers a few basic accessibility features. Andy explains each rule of the reset, and I’ve found it to be a solid starting point.
Let’s look at a few modern browser inconsistencies that can cause layout bugs.
Overflow From Viewport Units And Scrollbars
Without removing the margin on the body, our simple example from the overflow section triggers overflow. That’s because we used 100vw as one of the possible values for the width of the main element. Since it’s not subtracting the margin, it experiences overflow due to 100vw being 16px wider than the available space between the body’s margins.
Depending on the browser and operating system, you may also experience browser scrollbar widths upsetting the 100vw calculation as well. Currently, the fix is to update to 100% if you can.
Soon we’ll also have the scrollbar-gutter property to help us account for scrollbar widths. This property is being extended in CSS Overflow Module Level 4 and has gained support in Chromium browsers from version 94. Bramus has an excellent breakdown of scrollbar-gutter of how it will work and what it will help solve. The summary of the solution is to make sure you leave room for scrollbars while achieving an even gap appearance on both sides of the content by adding: overflow: auto; scrollbar-gutter: stable both-edges;.
Note :If you aren’t sure your content requires scrollbars but know that it may need them sometimes, be sure to use the auto value for overflow. This tells the browser only to add them when the element needs them to accommodate the content. That said, users can customize their preferences to always show scrollbars, which is why the scrollbar-gutter property will be extra valuable!
It can also be problematic to set min-height: 100vh on the body without removing the margin first. There are other issues with 100vh specifically, and those have to do with how different devices and browser combinations have implemented the calculation for 100vh.
While 100vh appears to work on most desktop contexts, you may have experienced the frustration of having what seems like unexpected behavior, particularly when tested on iOS in WebKit browsers. Within a fixed layout set to 100vh, the bottom part of the website content is stuck behind the browser chrome, making it inaccessible when scrolling is prevented. For example, in a fixed height mobile menu or a single page app or game trying to fill no more than the available viewport height.
Matt Smith went seeking a solution and discovered in some scenarios the 100vh issue can be resolved by using the following combination:
html {
  height: -webkit-fill-available;
}

body {
  min-height: 100vh;
  /* mobile viewport bug fix */
  min-height: -webkit-fill-available;
}
This solution is imperfect, and I suggest testing on an actual device to ensure it works for your layout.
Jen Simmons also shared a technique (timestamp: 13m) that is available in Safari 15 to adjust this behavior with the help of CSS environment variables. The safe-area-inset-bottom will be 0 when not applicable and dynamically adjust when it does apply. This environment variable can be used for padding, margin, and within calc as shown:
body {
  min-height: calc(100vh — env(safe-area-inset-bottom));
}
The CSS Working Group has an improved solution in draft to address this category of issues, which will be a set of new units for “Large, Small, and Dynamic Viewport Sizes.” These are intended to better correspond with the dynamic behavior of the changing browser chrome as is the cause of the WebKit troubles.
Here’s a summary of the current draft (note that these may still have some changes before they are stable in browsers):
- Small viewport-percentage units (svh, svb, svw, svi)
Equivalent to the remaining viewport space when all dynamic UI elements are expanded (ex. URL bar and virtual keyboard), and will not change its value even as the browser chrome changes. - Large viewport-percentage units (lvh, lvb, lvw, lvi)
The size opposite of small, calculated to assume all dynamic UI elements are retracted. - Dynamic viewport-percentage units (dvh, dvb, dvw, dvi)
The unstable value of the visible viewport space that changes along with dynamic browser chrome changes.
Typography Element Properties
UA styles also include default styles for common typography elements such as headings, paragraphs, and lists. Typically, CSS resets or frameworks will have already addressed these things. And, while you may not consider differences in these properties to be “bugs,” it’s helpful to understand that they are not the same defaults cross-browser since these styles are some of the most impactful.
The main note here is that if you notice an inconsistency, you may want to select your preferred value (such as a particular font-size for an h1) and add it to your stylesheet.
Differences In Browser Feature Support
Browser differences in feature support wins as the most frustrating category, stretching from modern browsers back to the beginning of CSS. Quite simply, not all browsers support all CSS properties equally.
As mentioned earlier, we are in a time of near feature parity but also in a time of rapid development and growth of the CSS language. So the issues we have due to feature support are shrinking, but at the same time, we’re in a holding pattern as we wait for the new things to reach general availability.
Fortunately, we have several tools available to help research feature support during development and to help address inconsistencies.
The one you may already know about is caniuse, which lists support tables for both CSS and JavaScript features. The caveat to be aware of here is that the browser usage data is based on Statcounter, a sampling of 2 million websites. The percentages, therefore, may not match your audience and should only be one data point in trying to determine whether it’s “safe” to use a particular feature for your project.
Another helpful tool is the VSCode extension webhint, which is also powering part of the Issues panel in Edge. Webhint alerts you about features that may have lower browser support to help you be aware during development. You can configure what browsers are considered by including a browserslist in your package.
Knowing about feature support during development helps you make an informed solution. But sometimes, it’s not about whether a feature is strictly supported but whether or not the property has undergone syntax changes. For example, sometimes properties are released with “vendor prefixes.” You’ve likely seen these — ones that begin with -webkit or -moz.
Usually, the stable version of the property does not continue to have a prefix, but it’s best to include the prefixed version for the broadest support. Fortunately, you can automate this step instead of doing it manually with the popular autoprefixer package. In addition, there is support for including it in many build processes, such as postCSS (the method I use). Like webhint, it looks at your browserlist to determine what level of support to provide prefixed properties.
Beyond these tools, each browser’s dev tools have a method of signifying when that browser doesn’t support a property. Chromium, Safari, and Firefox show a yellow warning triangle alongside some other styling and a hover-triggered property to denote an unsupported property.
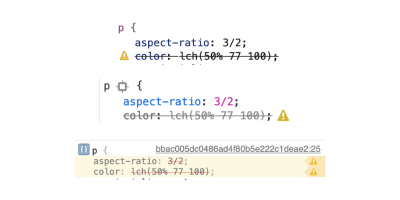
Reviewing how to handle a lack of support for a feature is a bit beyond the scope of this article. And, providing fallbacks if needed or setting up solutions as progressive enhancements is going to be unique. That’s why setting yourself up with tools to help check support during development is so important. Then, you can create a solution that fits the level of support you need instead of having a complete solution that you then have to debug and define a fallback for once you get bug reports.
Unexpected Cascading Layout Inheritance
Ok, so you feel you’re using well-supported CSS features. And you’ve just added a new section to your site, and you feel pretty confident about the CSS. But when you go to look at it in the browser, things seem incorrect.
Particularly when using a framework or design system and then also writing custom CSS, we can encounter bugs related to the cascade and inheritance. Something that works in isolation may not work when placed within a screen layout.
Fortunately, all browser dev tools allow tracing the cascade. By reviewing the Styles panel, we can see what rules are overriding our styles. Or, we can locate a parent that is adding a layout method we weren’t expecting for our child component.
This simple example shows that the rule for main * is “winning” the cascade for applying color to the paragraph. Dev tools manipulate the order in the Styles panel to show the most applicable styles on top. Then, we can see that the color property for just p is crossed-out as an extra indicator that that rule definition is not applied.
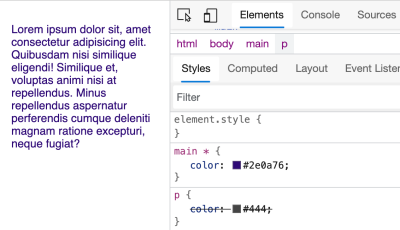
p for the selected paragraph, making it a navy blue instead of gray. (Large preview)Let’s take a quick step back to CSS basics on the cascade. For this example, some of you may have realized that main * has equal specificity to p. But the other very critical part of the cascade is the order of rules, and here is the order from the stylesheet for the example:
body {
  color: #222;
}

p {
  color: #444;
}

main * {
  color: hsl(260, 85%, 25%);
}
If we want to make sure the rule for just p “wins,” then we either need to make sure it follows the main rule or increase its specificity.
This basic feature of CSS is extremely powerful but can be perceived as a “bug” if you aren’t as familiar with how it works. And it can certainly be frustrating if you are tasked with deploying a new feature on a legacy codebase or required to use a framework where it’s more challenging to get around inherited specificity.
Solving issues due to the cascade often doesn’t have an easy answer. It’s worth the time to step back from the immediate problem and examine the layers of styles coming together to identify the best place to make a change. Recognize that an !important could cause you further issues related to specificity down the line, so try out reordering properties if possible first. Or, you may want to switch to setting up “components,” which provide a layer of scoping for styles and encourage being more intentional about inheritance.
Speaking of layers — speeding through the spec process is another new feature that was designed specifically to assist in orchestrating the cascade and alleviating clashes. At present, the Cascade Layers spec (@layer) has gained experimental support in all the top browsers. For more info on this upcoming feature, check out the excellent overview on CSS layers by Bramus.
Note: Please make sure to check the resources at the end of this article for a few links related to checking CSS specificity.
CSS Resiliency Failures From DOM Changes
Sometimes, a carefully crafted CSS solution stops working. In my experience, that often happens due to the underlying DOM changing. When we add CSS based on the current DOM, our solution isn’t resilient to change.
For example, if we create a grid layout rule for a list defined as .grid li, and then the DOM structure changes to be a set of article elements, the CSS will break.
Or, if we set up a series of icons that fit perfectly within the original space, but then the client needs to add an icon, and it causes overflow.
These examples really show why CSS is a valuable skill. If you can write scalable, DOM-independent CSS, your solutions will scale, and you will reduce the likelihood of this category of bugs.
“
Debugging this category usually means tracing back to the original rules to see if they can be extended to work for the updated context. Again, you can use dev tools to find the applied rules and even follow the reference link to go to the source.
Note: For more tips on how to handle this category with specific things to consider, review my article on future-proofing CSS styles.
Layout Swaps To Help Avoid CSS Bugs
Let’s look at a few specific examples that may cause layout bugs and how to address them.
Layout Spacing
Once flexbox was introduced, many grid layout solutions were released that all had some math to compute the width of the flex children. In addition, that width had to be aware of the addition of margin to add space between the children.
Good News: The gap property for flexbox is now supported in all evergreen browsers!
CSS grid also supports the gap property. The advantage of gap over margin is that it will always only apply between elements, regardless of orientation. So, no more funky business of trying to attach margin to the “correct” side or having to use negative margin on the parent to counteract nested margin.
Unlike margin, the use of gap is less likely to cause overflow since it never applies to the outer edge of the elements. However, you may still experience overflow if the children cannot resize to a narrower width.
Handling Element Widths
If either your flex or grid children are causing overflow, here are two methods you may try as upgrades.
For flex, ensure you use flex-basis instead of width and that the flex-shrink value is set to 1. These properties will ensure that the element is allowed to be reduced in size.
For grid, a method I often use to achieve auto-wrapping behavior for grid children is the following:
grid-template-columns: repeat(auto-fit, minmax(30ch, 1fr));
But, this prevents elements shrinking below that minimum width of 30ch. So, instead, we can update to this solution that keeps our minimum on larger viewports/within larger parents while still allowing child elements to shrink within narrower spaces:
grid-template-columns: repeat(auto-fit, minmax(min(100%, 30ch), 1fr));
I often find CSS functions very handy in these sorts of scenarios. If you’re unfamiliar, you may enjoy my article on practical uses of CSS functions.
Outside of a grid or flex context, we can achieve a similar behavior for elements to prevent setting an absolute width. We discussed in the overflow section how absolutes could often cause problems. But, there are, of course, times when we do want to provide some width parameters.
Once again, my preferred method for setting a flexible width uses the CSS function of min(). In this example, it is a bit of a shorthand for setting both width and max-width at once. The min() function will use the smaller computed value, which dynamically changes as the element’s context changes:
width: min(100vw - 2rem, 80ch);
The min() function accepts more than two values, so you could even add a percentage value here as well. Then, your container would be responsive not just to the viewport but when nested in other containers as well, reducing overflow bugs even further—and achieving our mission of creating scalable, DOM-independent styles!
Review the use of min() as a container style as well as to make grid children more flexible in this CodePen:
min() and CSS Grid for responsive containers (codepen.io)
Cumulative Layout Shift
A more recent hot topic in site performance and related metrics is Cumulative Layout Shift (CLS). This is the Google Lighthouse score for how much elements shift or jump during page load. Some offenders are pretty obvious, such as ads and popup banners. Those things use motion and are typically late or purposely delayed in loading.
Now, before you go attacking the problem, make sure there is one. Chrome and Edge include the “Lighthouse” panel in dev tools which you can use to run a report for both desktop and mobile versions of your site. If CLS is not a problem, that score will be less than 0.1 and be displayed with a green indicator.

Two other things that may affect your site are images and custom fonts.
Fairly recently, all browsers have begun to reserve space for images if they include width and height attributes. Those attributes provide the two necessary pieces of information for the browser to calculate the image’s aspect ratio and hold that space within the page layout.
However, due to responsive design, many of us are used to stripping those attributes assuming that CSS will take over. As Jen Simmons explains, it’s time to add those back in. In addition, you may need to tweak your responsive image CSS slightly to include the following somewhat more specific rule, which will allow the image to respond to narrower contexts without losing its aspect ratio:
img[width] {
  height: auto;
}
As for custom fonts, the issue can come in here when the custom font and the designated system fallback font have a significant mismatch. In years past, we’d call it FLOUT (flash of unstyled text). This “flash” is from the delay in time between the initial page load and the custom font loading.
In the example video from my own site that has this problem, I’ve used the Network Conditions panel in Edge to load the site with “Network throttling” set to “Slow 3G.”
In my case, the actual CLS score doesn’t indicate the problem is severe enough to stress about resolving. However, if the font loading delay causes lots of elements to shift, that’s when it is worth looking into ways to alleviate the shifting problem.
Sometimes you can select a fallback system font that better matches the custom font so that the relative size is a closer match. Or, you can reduce the effect by setting a minimum size on the parent elements or adjusting other layout attributes so that it doesn’t cause a significant shift when the font loads.
Simon Hearne did a deep dive into what causes layout shifts due to fonts as well if you’d like to learn more about the problem, especially if you’re working on a more text-heavy site where the impact on CLS is more significant. They conclude that the ultimate solution to strictly address the layout shift is to use font-display: optional but concede that this is not optimal from a design perspective. Simon provides more solutions to help you select the right path for your site, including a handy CodePen to help you test fallbacks. Google also provides a resource describing preloading fonts.
Resources For Debugging CSS
We covered some frequent causes of CSS bugs and how to address them. Here are more resources that can help you with debugging CSS:
- Ahmad Shadeed wrote an ebook (paid) called Debugging CSS
- MDN has a dedicated resource on debugging CSS, which covers more about using dev tools
- Additionally, you may find the MDN article on handling common HTML and CSS problems useful
- Worth another mention is Miriam Suzanne’s video: Why is CSS So Weird?
- To check on and better understand CSS specificity, try out this tool from Kitty Giraudel called “Selectors Explained“
Additionally, outside of the popular browser’s dev tools, you may find these two alternates helpful due to their extra tools and features:
- Polypane (paid) is a browser that shows you multiple views of your site to test responsive design but also has additional features that can help you catch bugs early.
- VisBug is a Chromium extension that gives you extra info about elements, which can also help pinpoint issues.
Further Reading
- Sticky Headers And Full-Height Elements: A Tricky Combination
- The Design Leader Dilemma
- The Hype Around Signals
- Embracing Introversion In UX


 Celebrating 10 million developers
 Register for free to attend Axe-con
 Register now for WAS 2026
 SurveyJS: White-Label Survey Solution for Your JS App


