How To Implement Search Functionality In Your Nuxt App Using Algolia InstantSearch
Giving users the ability to quickly search through and navigate our content easily comes with great benefits. This not only improves the user experience, but also increases user retention and boosts conversion as users can now explore beyond what brought them to our site in the first place.
In this tutorial, we’ll be looking at how to integrate this search functionality into our Nuxt app using Algolia. Algolia is a third-party service that we can integrate into our app and provides us with a set of tools that allow us to create a full search experience in our sites and applications.
We’ll be using Nuxt Content, “Git Based Headless CMS” which allows us to create and manage content using Markdown, XML, JSON files, and so on. We’ll build a Nuxt site with Nuxt Content with a search feature using Algolia InstantSearch, for styling, we’ll use TailwindCSS. This tutorial is aimed at Vue.js devs that are familiar with Nuxt.
Prerequisites
To follow along with this tutorial, you’ll need to have the following installed:
- Node,
- A text editor, I recommend VS Code with the Vetur extension (for Vue.js syntax features in VS Code),
- A terminal, you can use VS Code’s integrated terminal or any other of your choice.
You’ll also require a basic understanding of the following in order to follow along smoothly:
- HTML, CSS & JavaScript,
- Vue.js,
- Nuxt.js,
- TailwindCSS.
Setting Up Our Nuxt App
Nuxt.js is a framework built on Vue, it has many capabilities and features including Server-Side Rendering (SSR).
To install it, open our terminal and run:
npx create-nuxt-app <project-name>“Where
<project-name>is the name of our project folder, I’ll be usingalgolia-nuxtfor this project.”
Running the command will ask you some questions (name, Nuxt options, UI framework, TypeScript, etc. ). To find out more about all the options, see the Create Nuxt app.
When asked for Nuxt.js modules, make sure to select Content - Git-based headless CMS to install the nuxt/content module along with our Nuxt app.
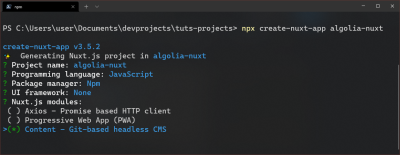
After selecting all of your options, installation can begin. My selected options look like this:

After successfully installing the Nuxt app, navigate to the directory by running this command:
cd algolia-nuxtInstall Nuxt Content Separately
If you already have Nuxt set up before now, you can install the content module by running the command.
Skip this if you’ve already selected to install the nuxt/content module along with our Nuxt app.
#install nuxt content

npm install @nuxt/content
Then you can add it to our modules property inside our nuxt.config file.
//nuxt.config.js

export default {
  modules: ['@nuxt/content']
}
Install And Setup TailwindCSS
TailwindCSS is a utility first CSS framework that provides us with custom classes we can use to style our app.
We’ll also be using TailwindCSS Typography, which is “a plugin that provides a set of prose classes you can use to add beautiful typographic defaults to any vanilla HTML you don’t control (like HTML rendered from Markdown, or pulled from a CMS).”
First, we install @nuxtjs/tailwindcss which is a Nuxt module for TailwindCSS integration, as well as TailwindCSS and its peer-dependencies using npm:
npm install -D @nuxtjs/tailwindcss tailwindcss@latest postcss@latest autoprefixer@latestAdd the @nuxtjs/tailwindcss module to the buildModules section of our nuxt.config.js file:
// nuxt.config.js

export default {
  buildModules: ['@nuxtjs/tailwindcss']
}
Create Configuration File
Next, generate our tailwind.config.js file:
npx tailwindcss initThis will create a minimal tailwind.config.js file at the root of our project:
//tailwind.config.js

module.exports = {
  purge: [],
  darkMode: false, // or 'media' or 'class'
  theme: {
    extend: {},
  },
  variants: {
    extend: {},
  },
  plugins: [],
}
Create a tailwind.css file in assets/css/ use the @tailwind directive to inject TailwindCSS’ base, components, and utilities styles:
/*assets/css/tailwind.css*/

@tailwind base;
@tailwind components;
@tailwind utilities;
You can import the CSS file into our components or make it accessible globally by defining the CSS files/modules/libraries you want to set globally (included in every page).
  /* nuxt.config.js*/

  // Global CSS: https://go.nuxtjs.dev/config-css
  css: [
    // CSS file in the project
    '@/assets/css/tailwind.css',
  ],
Here, we have added the path to our tailwind.css file to the list of global CSS files in our nuxt.config.js.
“The
@/tells Nuxt that it’s an absolute path to look for the file from the root directory.”
Install TailwindCSS Typography
# Using npm
npm install @tailwindcss/typography
Then add the plugin to our tailwind.config.js file:
// tailwind.config.js
module.exports = {
  purge: [],
  darkMode: false, // or 'media' or 'class'
  theme: {
    extend: {},
  },
  variants: {
    extend: {},
  },
  plugins: [
    require('@tailwindcss/typography'),
  ],
}
Configure TailwindCSS To Remove Unused Styles In Production
In our tailwind.config.js file, configure the purge option with the paths to all of our pages and components so TailwindCSS can tree-shake unused styles in production builds:
// tailwind.config.js
module.exports = {
  purge: [
    './components/**/*.{vue,js}',
    './layouts/**/*.vue',
    './pages/**/*.vue',
    './plugins/**/*.{js,ts}',
    './nuxt.config.{js,ts}',
  ],
  darkMode: false, // or 'media' or 'class'
  theme: {
    extend: {},
  },
  variants: {
    extend: {},
  },
  plugins: [
    require('@tailwindcss/typography'),
  ],
}
Since we’ve installed the packages, let’s start our app:
npm run devThis command starts our Nuxt app in development mode.

Nice 🍻
Creating Our Pages And Articles
Now, let’s create our articles and a blog page to list out our articles. But first, let’s create a site header and navigation component for our site.
Creating A Site Header And Navigation
Navigate to our components/folder, and create a new file siteHeader.vue and enter the following code:
<!-- components/siteHeader.vue -->

<template>
  <header class="fixed top-0 w-full bg-white bg-opacity-90 backdrop-filter backdrop-blur-md">
    <div class="wrapper flex items-center justify-between p-4 m-auto max-w-5xl">
      <nuxt-link to="/">
        <Logo />
      </nuxt-link>

      <nav class="site-nav">
        <ul class="links">
          <li>
            <nuxt-link to="/blog">Blog</nuxt-link>
          </li>
        </ul>
      </nav>
    </div>
  </header>
</template>
Here, in our <header> we have a <Logo /> component wrapped in <nuxt-link> which routes to the home page and another <nuxt-link> that routes to /blog (We’ll create the blog page that we will create later on).
This works without us importing the components and configuring routing ourselves because, by default, Nuxt handles importing components and routing for us.
Also, let’s modify the default <Logo /> component. In components/Logo.vue, replace the content with the following code:
<!-- components/Logo.vue -->

<template>
  <figure class="site-logo text-2xl font-black inline-block">
    <h1>Algolia-nuxt</h1>
  </figure>
</template>
We can now add our siteHeader.vue component to our site. In layouts/default.vue, add <site-header /> just above the <Nuxt /> component.
<!-- layouts/default.vue -->

<template>
  <div>
    <site-header />
    <Nuxt />
  </div>
</template>

...
The <Nuxt /> component renders the current Nuxt page depending on the route.
Creating Our First Article
In content/, which is a folder created automatically for the nuxt/content module, create a new folder articles/ and then a new file in the folder first-blog-post.md. Here is the file for our first article in markdown format. Enter the following code:
<!-- content/articles/first-blog-post.md -->

---

title: My first blog post
description: This is my first blog post on algolia nuxt
tags: [first, lorem ipsum, Iusto]

---

## Lorem ipsum

Lorem ipsum dolor sit amet consectetur, adipisicing elit.
Assumenda dolor quisquam consequatur distinctio perferendis.

## Iusto nobis nisi

repellat magni facilis necessitatibus, enim temporibus.

- Quisquam
- assumenda
- sapiente explicabo
- totam nostrum inventore
The area enclosed with --- is the YAML Front Matter which will be used as a custom injected variable that we will access in our template.
Next, we’re going to create a dynamic page which will be used to:
- Fetch the article content using
asyncDatawhich runs before the page has been rendered. We have access to our content and custom injected variables through the context by using the variable$content. As we are using a dynamic page, we can know what article file to fetch using theparams.slugvariable provided by Vue Router to get the name of each article. - Render the article in the template using
<nuxt-content>.
Ok, navigate to pages/ and create a blog/ folder. Create a _slug.vue (our dynamic page) file and insert the following:
<!-- pages/blog/_slug.vue -->

<template>
  <article class="prose prose-lg lg:prose-xl p-4 mt-24 m-auto max-w-4xl">
    <header>
      <h1>{{ article.title }}</h1>
      <p>{{ article.description }}</p>
      <ul class="list-none">
        <li class="inline-block mr-2 font-bold font-monospace" v-for="tag in article.tags" :key="tag" > {{tag}} </li>
      </ul>
    </header>
    <!-- this is where we will render the article contents -->
    <nuxt-content :document="article" />
  </article>
</template>

<script>
export default {
  async asyncData({ $content, params }) {
    //here, we will fetch the article from the articles/ folder using the name provided in the `params.slug`
    const article = await $content('articles', params.slug).fetch()

    //return `article` which contains our custom injected variables and the content of our article
    return { article }
  },
}
</script>
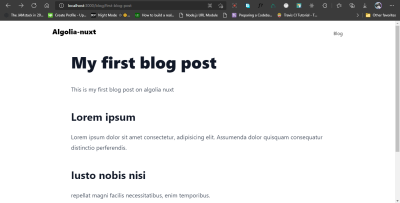
If you go to your browser and navigate to https://localhost:3000/blog/first-blog-post you should see our rendered content:
Now that our dynamic page is working and our article is rendering, let’s create some duplicates for the purpose of this tutorial.
<!-- content/articles/second-blog-post.md -->

---

title: My first blog post
description: This is my first blog post on algolia nuxt
tags: [first, Placeat amet, Iusto]

---

## Lorem ipsum

Lorem ipsum dolor sit amet consectetur, adipisicing elit.
Assumenda dolor quisquam consequatur distinctio perferendis.

## Iusto nobis nisi

repellat magni facilis necessitatibus, enim temporibus.

- Quisquam
- assumenda
- sapiente explicabo
- totam nostrum inventore
Create Blog Page To List Our Articles
Let’s now create a blog page to list our articles. This is also where our search bar will live. Create a new file pages/blog/index.vue.
<!-- pages/blog/index.vue -->

<template>
  <main>
    <section class="p-4 mt-24 m-auto max-w-4xl">
      <header>
        <h1 class="font-black text-2xl">All posts</h1>

        <!-- dummy search bar -->
        <div class="search-cont inline-flex gap-2 bg-white p-2 rounded-lg shadow-lg">
          <input class="px-2 outline-none" type="search" name="search" id="search">
          <button class="bg-blue-600 text-white px-2 rounded-md" type="submit">Search</button>
        </div>
      </header>
      <ul class="prose prose-xl">
          <!-- list out all fetched articles -->
        <li v-for="article in articles" :key="article.slug">
          <nuxt-link :to="{ name: 'blog-slug', params: { slug: article.slug } }">
            <h2 class="mb-0">{{ article.title }}</h2>
            <p class="mt-0">{{ article.description }}</p>
          </nuxt-link>
        </li>
      </ul>
    </section>
  </main>
</template>

<script>
export default {
  async asyncData({ $content }) {
    // fetch all articles in the folder and return the:
    const articles = await $content('articles')
      // title, slug and description
      .only(['title', 'slug', 'description'])
      // sort the list by the `createdAt` time in `ascending order`
      .sortBy('createdAt', 'asc')
      .fetch()

    return { articles }
  },
}
</script>
Here, in our asyncData function, when fetching $content('articles') we chain .only(['title', 'slug', 'updatedAt', 'description']) to fetch only those attributes from the articles, .sortBy('createdAt', 'asc') to sort it and lastly fetch() to fetch the data and assign it to const articles which we then return.
So, in our <template>, we can the list of articles and create links to them using their slug property.
Our page should look something like this:

Great 🍻
Install And Set Up Algolia Search And Vue-instantSearch
Now that we’ve gotten the basic stuff out of the way, we can integrate Algolia Search into our blog site.
First, let’s install all the packages we will be needing:
#install dependencies

npm install vue-instantsearch instantsearch.css algoliasearch nuxt-content-algolia remove-markdown dotenv
vue-instantsearch
Algolia InstantSearch UI component/widget library for Vue.instantsearch.css
Custom styling for instantSearch widgets.algoliasearch
A HTTP client to interact with Algolia.nuxt-content-algolia
Package for indexing our content and sending it to Algolia.remove-markdown
This strips all markdown characters from thebodyPlainTextof the articles.dotenv
This helps to read environment variables from.envfiles.
We’ll be using these packages throughout the rest of this tutorial, but first, let’s set up an Algolia account.
Set Up Algolia Account
Sign up for an Algolia account at https://www.algolia.com/. You can do this for free, however, this will give you a trial period of 14days. Since we’re not performing heavy tasks with Algolia, their free tier will do just fine for our project after the trial expires.
You’ll be taken through some onboarding steps. After that, an UNAMED APP will be created for you. On the sidebar, on the left, navigate to the API Keys you’ll be provided with:
- Application ID
This is your unique application identifier. It’s used to identify you when using Algolia’s API. - Search Only API Key
This is the public API key to use in your frontend code. This key is only usable for search queries and sending data to the Insights API. - Admin API Key
This key is used to create, update and DELETE your indices. You can also use it to manage your API keys.
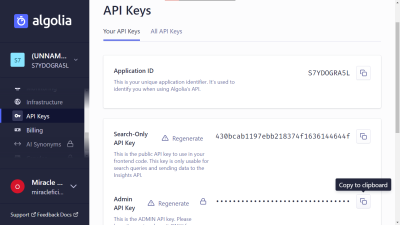
Now that we have our API Keys, let’s save them in an .env file for our project. Navigate to the project root folder and create a new file .env and enter your API keys:
.env

ALGOLIA_APP_ID=algolia-app-id
ALGOLIA_API_KEY=algolia-admin-api-key
Replace algolia-app-id and algolia-admin-api-key with your Application ID and Admin API Key respectively.
Create An 'Articles' Index For Our Nuxt Articles In Algolia
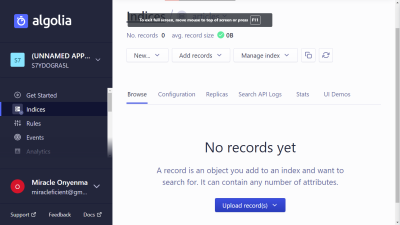
On your Algolia account, go to Indices and click on create Index. Then enter the name of your index and we’ll be using articles for this tutorial.

'articles' index on Algolia. (Large preview)As you can see, our 'article' index has been created.
'articles' index created. (Large preview)Set Up nuxt-content-algolia To Send Content Index To Algolia
We’ve successfully created an index property on our account. Now we have to generate an index from our Nuxt articles which is what Algolia will use to provide results for search queries. This is what the nuxt-content-algolia module that we previously installed is for.
We need to configure it in our nuxt.config.js.
First, we will add it to our buildModules:
// nuxt.config.js

...

// Modules for dev and build (recommended): https://go.nuxtjs.dev/config-modules
buildModules: ['@nuxtjs/tailwindcss', 'nuxt-content-algolia'],

...
Then, we create a new nuxtContentAlgolia object and add a few configurations to it:
// nuxt.config.js

export default {
...

nuxtContentAlgolia: {

  // Application ID
  appId: process.env.ALGOLIA_APP_ID,

  // Admin API Key
  // !IMPORTANT secret key should always be an environment variable
  // this is not your search only key but the key that grants access to modify the index
  apiKey: process.env.ALGOLIA_ADMIN_API_KEY,

  paths: [
    {
      name: 'articles',
      index: process.env.ALGOLIA_INDEX || 'articles',
      fields: ['title', 'description', 'tags', 'bodyPlainText']
    }
  ]
},


...
}
The nuxtContentAlgolia takes in the following properties:
appId
Application ID*.apiKey
Admin API Key.paths
An array of index objects. This is where we define where we want to generate indexes from. Each object takes the following properties:name
The name of the folder within thecontent/folder. In other words, we’ll be using files withincontent/articles/since we defined the name as'articles'.index
This is the name of the index we created on our Algolia dashboard.fields
An array of fields to be indexed. This is what Algolia will base its search queries on.
Generate bodyPlainText From Articles
Note that in the fields array, we have bodyPlainText as one of its values. Nuxt Content does not provide such a field for us. Instead, what Nuxt Content provides is body which is a complex object that will be rendered in the DOM.
In order to get our bodyPlainText which is simply all text, stripped of markdown and HTML characters, we have to make use of yet another package, remove-markdown.
To use the remove-markdown function we need to make use of Nuxt hooks. We’ll use the 'content:file:beforeInsert' hook which allows you to add data to a document before it is inserted, to strip off the markdown and add the generated plain text to bodyPlainText.
// nuxt.config.js

export default {
...

hooks: {
  'content:file:beforeInsert': (document)=>{
    const removeMd = require('remove-markdown');

    if(document.extension === '.md'){
      document.bodyPlainText = removeMd(document.text);
    }
  }
},

...
}
In the 'content:file:beforeInsert' hook, we get the remove-markdown package. Then we check if the file to be inserted is a markdown file. If it is a markdown file, we generate the plain text by calling removeMd which takes document.text — the text of our content, as an argument, which we assign to a new document.bodyPlainText property. The property will now be available for use through Nuxt Content.
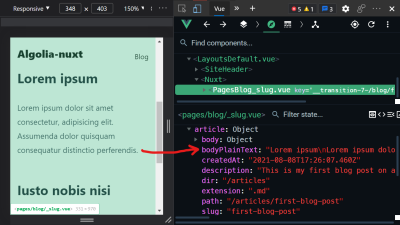
BodyPlainText generated and visible in Nuxt. (Large preview)Great! Now that that’s done, we can generate the index and send it over to Algolia.
Confirm Algolia Index
Alright. We’ve set up nuxt-content-algolia and we’ve generated bodyPlainText for our articles. We can now generate this index and send the data over to Algolia by building our project using nuxt generate.
npm run generateThis will start building our project for production and run the nuxtContentAlgolia config. When we look at our terminal after the build we should see that our content has been indexed and sent to Algolia.
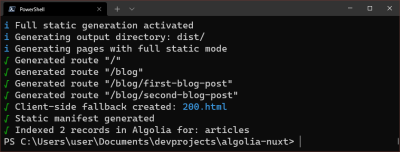
To verify, you can go to your Algolia dashboard:

Open Indices, then go to Search API logs, where you will see a log of operations performed with your Search API. You can now open and check the API call sent from your Nuxt project. This should have the content of your article as specified in the fields section of nuxtContentAlgolia config.
Nice! 🍻
Building The Search UI
So far we’ve been able to generate and send index data to Algolia, which means that we are able to query this data to get search results.
To do that within our app, we have to build our search UI.
Vue-InstantSearch provides lots of UI components using Algolia that can be integrated to provide a rich search experience for users. Let’s set it up.
Create And Configure vue-instantSearch Plugin
In order to use the Algolia InstantSearch widgets in our Nuxt app, we will have to create a plugin in our plugins folder.
Go to plugins/ and create a new file vue-instantsearch.js.
// plugins/vue-instantsearch.js

import Vue from 'vue'
import InstantSearch from 'vue-instantsearch'

Vue.use(InstantSearch)
Here, we’re simply importing InstantSearch and using it on the Vue frontend.
Now, we have to add the vue-instantSearch plugin to our plugins and build options in nuxt.config.js in order to transpile it to Vue.js.
So, go over to nuxt.config.js and add the following:
// nuxt.config.js

export default {
...

// Plugins to run before rendering page: https://go.nuxtjs.dev/config-plugins
plugins: ['@/plugins/vue-instantsearch.js'],

// Build Configuration: https://nuxtjs.org/docs/2.x/configuration-glossary/configuration-build#transpile
build: {
  transpile: ['vue-instantsearch', 'instantsearch.js/es']
}

...
}
InstantSearch code uses ES modules, yet it needs to be executed in Node.js. That’s why we need to let Nuxt know that those files should be transpiled during the build.
Now that we’ve configured our vue-instantSearch plugin, let’s create a search component.
Create A Search Component
Create a new file components/Search.vue.
Since we’ve installed vue-instantSearch as a plugin, we can use it within our Vue components.
<!-- components/Search.vue -->

...

<script>
import algoliaSearch from 'algoliasearch/lite'
import 'instantsearch.css/themes/satellite-min.css'

// configurations for Algolia search
const searchClient = algoliaSearch(
  // Applictaion ID
  '34IIDW6KKR',

  // Search API key
  '3f8d80be6c42bb030d27a7f108eb75f8'
)
export default {
    data(){
        return{
            searchClient
        }
    }
}
</script>
First, in the <script> section, we’re importing algoliaSearch and instantsearch.css.
Next, we provide the credentials for our Algolia search which are:
- Application ID,
- Search API key.
As parameters to algoliaSearch then assign it to searchClient which we will use in our <template> to configure our Algolia search widgets.
ais-instant-search Widget
ais-instant-search is the root Vue InstantSearch component. All other widgets need to be wrapped with the root component to function. The required attributes for this component are:
index-name
Name of the index to query, in this case, it would bearticles.search-clientalgoliaSearchobject containing Application ID and Search API Key.
<!-- components/Search.vue -->

<template>
  <div class="search-cont inline-flex gap-2 bg-white p-2 rounded-lg shadow-lg">
    <ais-instant-search index-name="articles" :search-client="searchClient">
    </ais-instant-search>
  </div>
</template>

...
ais-configure Widget
The ais-configure widget helps configure the search functionality by sending defined parameters to Algolia.
Any props you add to this widget will be forwarded to Algolia. For more information on the different parameters you can set, have a look at the search parameters API reference.
The parameters we’ll set for now will be:
attributesToSnippet
The name of the attribute orfieldto snippet in, we’ll soon see more on this.hits-per-page.camel
Number of results in one page.snippetEllipsisText="…"
Set...before and after snipped text.
<!-- components/Search.vue -->

<template>
  <div class="search-cont inline-flex gap-2 bg-white p-2 rounded-lg shadow-lg">
    <ais-instant-search index-name="articles" :search-client="searchClient">
      <ais-configure
        :attributesToSnippet="['bodyPlainText']"
        :hits-per-page.camel="5"
        snippetEllipsisText="…"
      >
      </ais-configure>
    </ais-instant-search>
  </div>
</template>

...
ais-autocomplete Widget
This widget is basically a wrapper that allows us to create a search result that autocompletes the query. Within this widget, we can connect to other widgets to provide a richer UI and access multiple indices.
<!-- components/Search.vue -->

<template>
  <div class="search-cont inline-flex gap-2 bg-white p-2 rounded-lg shadow-lg">
    <ais-instant-search index-name="articles" :search-client="searchClient">
      <ais-configure
        :attributesToSnippet="['bodyPlainText']"
        :hits-per-page.camel="5"
        snippetEllipsisText="…"
      >
        <ais-autocomplete>
          <template v-slot="{ currentRefinement, indices, refine }">
            <input
              type="search"
              :value="currentRefinement"
              placeholder="Search for an article"
              @input="refine($event.currentTarget.value)"
            />
            <ais-stats />
            <template v-if="currentRefinement">
              <ul v-for="index in indices" :key="index.indexId">
                <li>
                  <h3>{{ index.indexName }}</h3>
                  <ul>
                    <li v-for="hit in index.hits" :key="hit.objectID">
                      <h1>
                        <ais-highlight attribute="title" :hit="hit" />
                      </h1>
                      <h2>
                        <ais-highlight attribute="description" :hit="hit" />
                      </h2>
                      <p>
                        <ais-snippet attribute="bodyPlainText" :hit="hit" />
                      </p>
                    </li>
                  </ul>
                </li>
              </ul>
            </template>
            <ais-pagination />
          </template>
        </ais-autocomplete>
      </ais-configure>
    </ais-instant-search>
  </div>
</template>

...
So, within our ais-autocomplete widget, we’re doing a few things:
- Overriding the DOM output of the widget using the
defaultslot. We’re doing this using the scopes:currentRefinement: string: the current value of the query.indices: object[]: the list of indices.refine: (string) => void: the function to change the query.
...
<template v-slot="{ currentRefinement, indices, refine }">
...- Create a search
<input>to hold, change the query and value of thecurrentRefinement.
...
<input
    type="search"
    :value="currentRefinement"
    placeholder="Search for an article"
    @input="refine($event.currentTarget.value)"
/>
...- Render the search results for each index. Each index has the following properties:
indexName: string: the name of the index.indexId: string: the id of the index.hits: object[]: the resolved hits from the index matching the query.
...
<template v-if="currentRefinement">
    <ul v-for="index in indices" :key="index.indexId">
        <li>
            <h3>{{ index.indexName }}</h3>

...- Then render the results —
hits.
...
<ul>
    <li v-for="hit in index.hits" :key="hit.objectID">
      <h1>
        <ais-highlight attribute="title" :hit="hit" />
      </h1>
      <h2>
        <ais-highlight attribute="description" :hit="hit" />
      </h2>
      <p>
        <ais-snippet attribute="bodyPlainText" :hit="hit" />
      </p>
    </li>
</ul>

...
Here’s what we’re using:
<ais-highlight>
Widget to highlight the portion of the result which directly matches the query of the field passed to theattributeprop.<ais-snippet>
Widget to display the relevant section of the snippeted attribute and highlight it. We defined theattributeinattributesToSnippetin<ais-configure>.
Let’s run our dev server and see what our New search looks like.

Styling Our Search Component
InstantSearch comes with some default styles that we included in our project using the instantsearch.css package. However, we might need to change or add some styles to our components to suit the site we’re building.
The CSS classes with many widgets can be overwritten using the class-names prop. For example, we can change the highlighted style of <ais-highlight>.
<!-- components/Search.vue -->

...
<h1>
  <ais-highlight
    :class-names="{
      'ais-Highlight-highlighted': 'customHighlighted',
    }"
    attribute="title"
    :hit="hit"
  />
</h1>

...
And in our CSS:
<!-- components/Search.vue -->

...

<style>
    .customHighlighted {
      @apply text-white bg-gray-600;
    }
</style>
...
We see that the class we defined has been applied to the highlight.
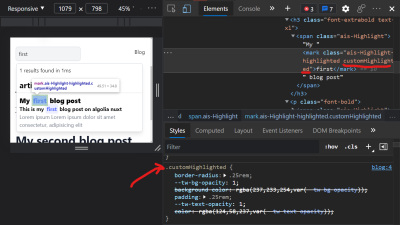
So, I’ll go ahead and style it using tailwind till I feel it looks good.
<!-- components/Search.vue -->

<template>
  <div class="search-cont relative inline-flex mt-6 bg-gray-100 border-2 rounded-lg focus-within:border-purple-600">
    <ais-instant-search-ssr index-name="articles" :search-client="searchClient">
      <ais-configure :attributesToSnippet="['bodyPlainText']" :hits-per-page.camel="5">
        <ais-autocomplete class="wrapper relative">
          <div slot-scope="{ currentRefinement, indices, refine }">
            <input class="p-2 bg-white bg-opacity-0 outline-none" type="search" :value="currentRefinement" placeholder="Search for an article" @input="refine($event.currentTarget.value)" />
            <div class="results-cont relative">
              <div
                class=" absolute max-h-96 overflow-y-auto w-96 top-2 left-0 bg-white border-2 rounded-md shadow-lg" v-if="currentRefinement">
                <ais-stats class="p-2" />
                <ul v-for="index in indices" :key="index.indexId">
                  <template v-if="index.hits.length > 0">
                    <li>
                      <h2 class="font-bold text-2xl p-2">
                        {{ index.indexName }}
                      </h2>
                      <ul>
                        <li
                          class="border-gray-300 border-t p-2 hover:bg-gray-100" v-for="hit in index.hits" :key="hit.objectID" >
                          <nuxt-link
                            :to="{
                              name: 'blog-slug',
                              params: { slug: hit.objectID },
                            }"
                          >
                            <h3 class="font-extrabold text-xl">
                              <ais-highlight
                                :class-names="{
                                  'ais-Highlight-highlighted':
                                    'customHighlighted',
                                }"
                                attribute="title"
                                :hit="hit"
                              />
                            </h3>
                            <p class="font-bold">
                              <ais-highlight
                                :class-names="{
                                  'ais-Highlight-highlighted':
                                    'customHighlighted',
                                }"
                                attribute="description"
                                :hit="hit"
                              />
                            </p>
                            <p class="text-gray-500">
                              <ais-snippet
                                :class-names="{
                                  'ais-Snippet-highlighted':
                                    'customHighlighted',
                                }"
                                attribute="bodyPlainText"
                                :hit="hit"
                              />
                            </p>
                          </nuxt-link>
                        </li>
                      </ul>
                    </li>
                  </template>
                </ul>
              </div>
            </div>
          </div>
        </ais-autocomplete>
      </ais-configure>
    </ais-instant-search-ssr>
  </div>
</template>

...

<style>
.customHighlighted {
  @apply text-purple-600 bg-purple-100 rounded p-1;
}
</style>
Alright, the styling is done and I’ve included a <nuxt-link> to route to the article on click.
<nuxt-link :to="{ name: 'blog-slug', params: { slug: hit.objectID }}">We now have something like this:

Configuring InstantSearch For Server-Side Rendering (SSR)
We now have our search component up and running but it only renders on the client-side and this means we have to wait for the search component to load even after the page loads. We can further improve the performance of our site by rendering it on the server-side.
According to Algolia, the steps for implementing server-side rendering are:
On the server:
- Make a request to Algolia to get search results.
- Render the Vue app with the results of the request.
- Store the search results on the page.
- Return the HTML page as a string.
On the client:
- Read the search results from the page.
- Render (or hydrate) the Vue app with search results.
Using Mixins, serverPreFetch, beforeMount
Following Algolia’s documentation on implementing SSR with Nuxt, we have to make the following changes:
<!-- components/Search.vue -->

...
<script>
// import 'vue-instantsearch';
import { createServerRootMixin } from 'vue-instantsearch'

import algoliaSearch from 'algoliasearch/lite'
import 'instantsearch.css/themes/satellite-min.css'

const searchClient = algoliaSearch(
  '34IIDW6KKR',
  '3f8d80be6c42bb030d27a7f108eb75f8'
)

export default {
  data() {
    return {
      searchClient,
    }
  },

  mixins: [
    createServerRootMixin({
      searchClient,
      indexName: 'articles',
    }),
  ],

  serverPrefetch() {
    return this.instantsearch.findResultsState(this).then((algoliaState) => {
      this.$ssrContext.nuxt.algoliaState = algoliaState
    })
  },

  beforeMount() {
    const results =
      (this.$nuxt.context && this.$nuxt.context.nuxtState.algoliaState) ||
      window.__NUXT__.algoliaState

    this.instantsearch.hydrate(results)

    // Remove the SSR state so it can’t be applied again by mistake
    delete this.$nuxt.context.nuxtState.algoliaState
    delete window.__NUXT__.algoliaState
  },
}
</script>
We’re simply doing the following:
createServerRootMixinto create a reusable search instance;findResultsStateinserverPrefetchto perform a search query on the back end;hydratemethod inbeforeMount.
Then in our <template>,
<!-- components/Search.vue -->

...
<ais-instant-search-ssr index-name="articles" :search-client="searchClient">
    ...
</ais-instant-search-ssr>
...
Here, we to replace ais-instant-search with ais-instant-search-ssr.
Conclusion
We’ve successfully built a Nuxt site with some content handled by Nuxt Content and integrated a simple Algolia search into our site. We’ve also managed to optimize it for SSR. I have a link to the source code of the project in this tutorial and a demo site deployed on Netlify, the links are down below.
We have tons of options available to customize and provide a rich search experience now that the basics are out of the way. The Algolia widgets showcase is a great way to explore those options and widgets. You’ll also find more information on the widgets used in this tutorial.
GitHub Source Code
- You can check out the source code here.
- You can play with the demo on https://algolia-nuxtx.netlify.app/.
Other Resources
Here are some links that I think you will find useful:
- Create a Blog with Nuxt Content by Debbie O’Brien
@nuxt/contentModule- Tailwindcss docs
- Vue InstantSearch
Further Reading
- An Introduction To CSS Scroll-Driven Animations: Scroll And View Progress Timelines
- Uniting Web And Native Apps With 4 Unknown JavaScript APIs
- How To Deal With Big Tooling Upgrades In Large Organizations
- How To Build An Accessible Front-End Application With Chakra UI And Nuxt.js


 Register now for WAS 2026
 Celebrating 10 million developers

 SurveyJS: White-Label Survey Solution for Your JS App


